Linux系统下玩转51单片机
本文最后更新于:2022年7月8日下午5点08分
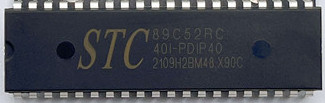
自这台不舍得仍的老笔记本安装了Ubuntu,就开起了各种折腾之路。现在来折腾一下C51单片机吧。所用芯片为STR89C52RC。
前言
单片机简介
单片机,属于微型控制器(MCU,Micrcontroller Unit)。51单片机是对兼容Intel 8051指令系统的单片机的统称,是8位单片机。主要品牌及产品有:
- Intel:80C31、80C51、87C51,80C32、80C52、87C52等;
- Atmel:89C51、89C52、89C2051,89S51(RC),89S52(RC)等;
- Philips、华邦、Dallas(达拉斯)、Siemens等公司的许多产品;
- STC(宏晶):STC89C51、STC90C51、STC11系列、STC15系列、STC8系列等。
国内的STC单片机有89/90/10/11/12/15这几个大系列,每个系列的特点如下:
- 89系列是传统的8051单片机,烧录方法有区别,但是功能上可以和AT89系列兼容,属于12T(1个机器周期=12个时钟周期)单片机
- 90系列是89系列的改进型,12T单片机
- 10和11系列是1T单片机,有PWM,4态IO接口,EEPROM等功能,但都没有ADC
- 12系列是增强型功能的1T单片机,型号后缀
AD的带ADC,后缀S2的除了ADC还带双串口 - 15系列是最新的产品,内部集成了高精度R/C时钟,不需要外部晶振
STC89C52系列参数
宏晶官方文档。
STC89C52和STC89C51的区别仅在于Flash和EEPROM大小,C51的Flash为4K而C52为8K,C51的EEPROM为9K而C52为5K。都有多种封装,常见的是体积较大的PDIP-40宽体双列
- Flash:8K bytes
- SRAM:512 bytes
- EEPROM:5KB
- I/O数量:35-bit(PDIP-40封装)
- 看门狗定时器,MAX810复位电路
- 3个16-bit定时器
- 4个外部中断,一个7向量4级中断结构和全双工串行口
- 最高运作频率35MHz,6T/12T可选
- UART串口:1个
- 工作电压Vcc:5V-3.8V
如果需要ADC, 可以选 STC12C5A60S2 系列, 1T型的指令时钟速度比普通STC89系列(12T)快, 做定时时要注意。
STC89C52系列单片机命名规则如下
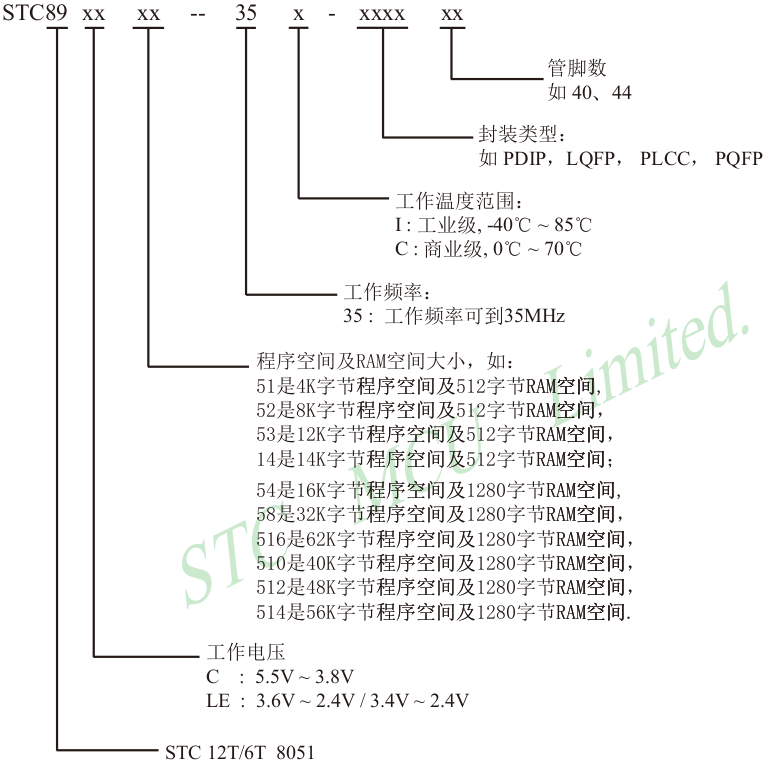
STC89C52系列通过单片机表面最下面一行最后几个字母区分90C版本及HD版本。
工具安装
安装编译工具SDCC
SDCC(Small Device C Compiler)是用于8位微控制器的免费开源软件,支持Windows, MacOS, Linux。sdcc手册。
库安装
在终端输入
sudo apt install sdcc安装,查看版本sdcc -v,返回版本为3.8.0,此方法安装的版本较老,可通过源码安装。源码安装
下载最新版
4.1.0解压
tar -xvjf sdcc-src-4.1.0.tar.bz2进入解压后的文件夹配置
./configure- 报错1:
configure: error: Cannot find required program bison. - 解决:
sudo apt install flex bison - 报错2:
configure: error: boost library not found (boost/graph/adjacency_list.hpp). - 解决:
sudo apt-get install libboost-date-time-dev libboost-program-options-dev libboost-system-dev libboost-filesystem-dev libboost-iostreams-dev - 报错3:
configure: error: ./configure failed for device/lib/pic14及configure: error: gputils (gpasm, gplink, and gplib) are required but not found. - 解决:在配置时加上参数
--disable-pic14-port --disable-pic16-port
- 报错1:
再次配置
./configure --disable-pic14-port --disable-pic16-port编译
make,运行时间较长。报错1:终端返回的信息往上翻可能会有如下提示
1
2
3
4
5
6
7
8
9
WARNING: 'makeinfo' is missing on your system.
You should only need it if you modified a '.texi' file, or
any other file indirectly affecting the aspect of the manual.
You might want to install the Texinfo package:
<http://www.gnu.org/software/texinfo/>
The spurious makeinfo call might also be the consequence of
using a buggy 'make' (AIX, DU, IRIX), in which case you might
want to install GNU make:
<http://www.gnu.org/software/make/>解决:
sudo apt install texinfo
再次编译
make安装
sudo make install添加环境变量(可能需要)
在
vim /etc/profile中添加代码export PATH=/usr/local/bin:$PATH,然后执行source /etc/profile使之生效。
检查和测试
查看版本号
sdcc -v,应该输出版本4.1.0查看库文件的位置
sdcc --print-search-dirs,默认的8051库的位置是/usr/local/share/sdcc/include/mcs51/测试代码
vim test01.c1
2
3
4
5char test;
void main(void) {
test = 0;
}编译
1
2
3
4
5
6
7
8
9
10
11# 产生test01.asm等文件
zhao@zhao-laptop:~/Documents/STC89C52RC/test01$ sdcc -c test01.c
zhao@zhao-laptop:~/Documents/STC89C52RC/test01$ tree .
.
├── test01.asm
├── test01.c
├── test01.lst
├── test01.rel
└── test01.sym
0 directories, 5 files1
2
3
4
5
6
7
8
9
10
11
12
13
14
15
16# 产生test01.ihx等文件
zhao@zhao-laptop:~/Documents/STC89C52RC/test01$ sdcc test01.c
zhao@zhao-laptop:~/Documents/STC89C52RC/test01$ tree .
.
├── test01.asm
├── test01.c
├── test01.ihx
├── test01.lk
├── test01.lst
├── test01.map
├── test01.mem
├── test01.rel
├── test01.rst
└── test01.sym
0 directories, 10 files- 或者使用一行命令
sdcc test02.c -o test02.ihx
- 或者使用一行命令
卸载
sudo make uninstall
安装烧录工具stcgal
根据Github上项目首页的说明, 直接用pip3 install stcgal安装, 然后执行stcgal -h查看输出。
编译链接与烧录
编写test02.c点亮P1.0的LED灯。这是一个很好的8051单片机示例项目。
1 | |
编译和链接
单个文件
可以这样直接编译
1 | |
多个文件
C或者C++程序在运行过程中,首先要生成.obj(windows)或.o(Unix)等目标文件,这就是编译(compile)。然后把这些文件合成执行文件的动作就叫链接(link)。这两个过程完成后才会产生可执行文件。
对于SDCC来说,编译生成中间文件.rel文件,然后链接生成.ihx文件。sdcc不支持多文件同时编译多个源文件,多个文件时,需要单个编译再链接。
编译(生成
.rel文件,其中-c参数表示compile only)1
2
3
4
5
6
7
8
9
10
11
12
13
14
15
16
17
18
19
20
21
22
23
24
25
26
27
28
29
30
31
32
33zhao@zhao-laptop:~/Projects/STC89C52RC/JiangKeDa/00-test$ tree
.
├── delay.c
├── delay.h
├── main.c
├── Makefile
├── SegmentDisplay.c
└── SegmentDisplay.h
0 directories, 6 files
zhao@zhao-laptop:~/Projects/STC89C52RC/JiangKeDa/00-test$ sdcc -c main.c && sdcc -c delay.c && sdcc -c SegmentDisplay.c
zhao@zhao-laptop:~/Projects/STC89C52RC/JiangKeDa/00-test$ tree
.
├── delay.asm
├── delay.c
├── delay.h
├── delay.lst
├── delay.rel
├── delay.sym
├── main.asm
├── main.c
├── main.lst
├── main.rel
├── main.sym
├── Makefile
├── SegmentDisplay.asm
├── SegmentDisplay.c
├── SegmentDisplay.h
├── SegmentDisplay.lst
├── SegmentDisplay.rel
└── SegmentDisplay.sym
0 directories, 18 files链接(生成
.ihx文件)1
2
3
4
5
6
7
8
9
10
11
12
13
14
15
16
17
18
19
20
21
22
23
24
25
26
27
28
29
30
31
32zhao@zhao-laptop:~/Projects/STC89C52RC/JiangKeDa/00-test$ sdcc main.rel delay.rel SegmentDisplay.rel
zhao@zhao-laptop:~/Projects/STC89C52RC/JiangKeDa/00-test$ tre
tred tree
zhao@zhao-laptop:~/Projects/STC89C52RC/JiangKeDa/00-test$ tree
.
├── delay.asm
├── delay.c
├── delay.h
├── delay.lst
├── delay.rel
├── delay.rst
├── delay.sym
├── main.asm
├── main.c
├── main.ihx
├── main.lk
├── main.lst
├── main.map
├── main.mem
├── main.rel
├── main.rst
├── main.sym
├── Makefile
├── SegmentDisplay.asm
├── SegmentDisplay.c
├── SegmentDisplay.h
├── SegmentDisplay.lst
├── SegmentDisplay.rel
├── SegmentDisplay.rst
└── SegmentDisplay.sym
0 directories, 25 files
烧录
使用-P指定协议(Protocals)
1 | |
提示Waiting for MCU, please cycle power:关闭电源开关再打开
默认波特率是19200,写入较慢,可以使用-b指定波特率
1 | |
端口一般不用指定(应该是/dev/ttyUSB0),会自动识别,如果同时有多个端口,使用-p指定端口
1 | |
使用-D显示串口交互信息
1 | |
出现的问题及解决办法
1 | |
查看串口权限
1 | |
发现串口属于dialout群组,通过几个命令查询群组
查看自己所在的群组groups
查看所有可用群组compgen -g
应该可以看到自己不属于dialout群组,将自己加入这个群组获得权限
1 | |
可能需要重启计算机,然后再执行烧录命令就可以了。
SDCC与Keil的区别以及注意事项
这是SDCC和Keil的不同之处。
1 | |
- 取反和非操作的区别
!符号是非,是位取反(是“位”),只针对位变量。~符号是按位取反(是“按位”),针对字节变量
1 | |
配合VSCode使用
首先要安装C/C++插件。
1 | |
使用VSCode打开test02.c所在工程目录,#include <mcs51/8051.h>部分会提示cannot open source file "mcs51/8051.h",将光标移动到该行,Ctrl+.然后点击Edit "includePath" setting,然后在工程目录下会生成.vscode文件夹,修改其下文件c_cpp_properties.json文件(只改includePath和compilerPath应该就可以)
1 | |
再看源文件,LED1处提示以下错误
1 | |
查了半天资料,语法应该没有错误,是可以烧录进单片机并点亮P1.0的LED灯的。猜测可能是SDCC跟标准C之间的一些差异。不在乎这个错误提示的可以留着,想去掉的将光标移动到提示错误的地方,Ctrl+.选择Disable error squiggles,就会发现.vscode文件夹下多了一个settings.json文件。
1 | |
编写Makefile文件
每次运行都要输入编译与烧录命令比较麻烦,可以编写makefile文件节省时间
单文件
1 | |
直接输入make clean && make flash即可清理文件并编译烧录程序。但这样仍然要在每一个项目下添加makefile文件,暂时没有找到更好的方法解决这一问题。
多文件
参考文章1,2,3。多文件只能依次编译,不同项目需要更改Makefile的编译和链接部分。
1 | |
串口调试
与单片机打交道经常需要串口通信,这就需要串口工具。在VScode里找到一个串口调试工具,但是目前还不支持Linux系统,只能找独立软件,搜索一番后,CuteCom是个不错的的选择。
可以直接sudo apt install cutecom,但是版本很老,是5年前的0.30.3版本,我们还是用源码安装(虽然源码也是3年前的。。。)。
从项目地址下载最新版后解压
1 | |
进入文件夹并cmake
1 | |
有可能会提示错误Could not find a package configuration file provided by "Qt5Widgets" with any of the following names: Qt5WidgetsConfig.cmake / qt5widgets-config.cmake。需要安装qt5
1 | |
再次执行cmake,成功。
1 | |
然后再执行
1 | |
检查是否安装正确
1 | |
可以看到0.51.0版本已安装完毕。打开软件
1 | |
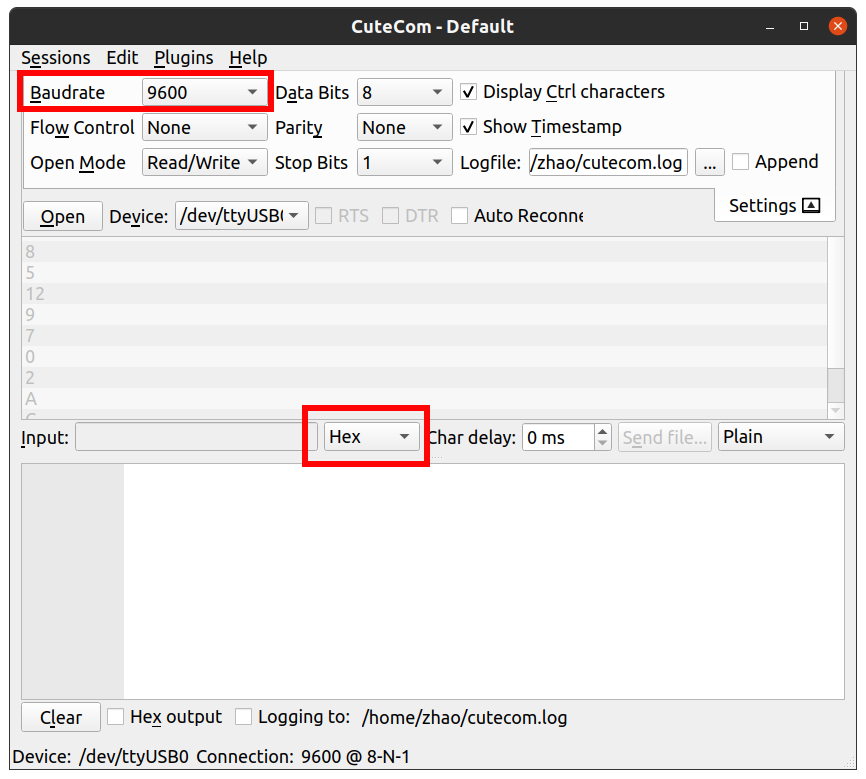
点击右侧Settings可以打开串口设置界面,选择串口号,选择程序中对应的波特率,点击Open就可以打开串口进行通信了。要发送数据给串口设备,就在Input中输入数据,如果是数字要选用16进制Hex,如果是文本格式要选用None。如果程序要再次编译运行,需要先点击Close停止CuteCom。
一些问题
51单片机的存储器
参考。
时序图
参考。
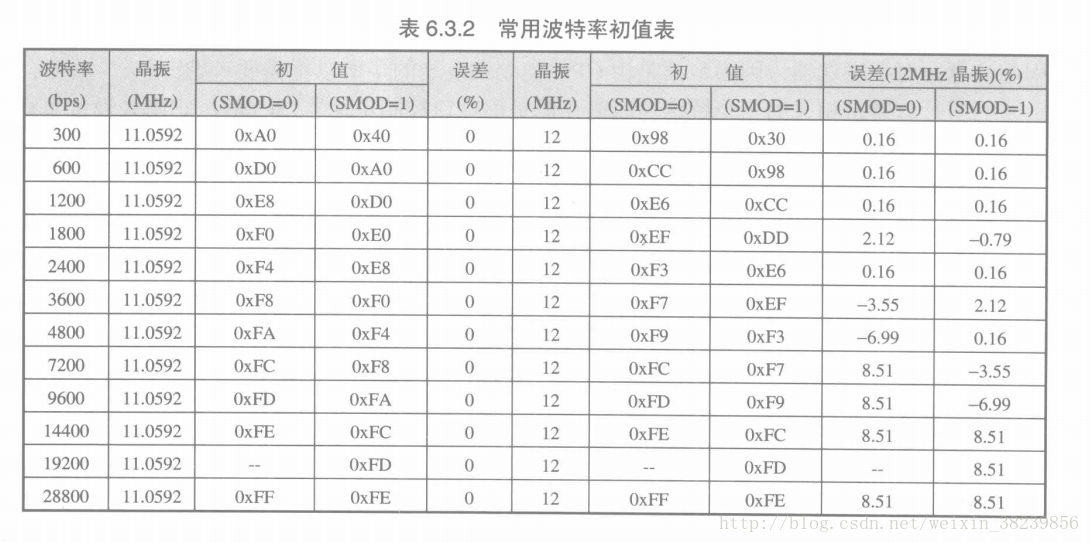
波特率初值表
C语言知识点
参考。
参考资料
感谢这篇文章,讲的很详细。
还有这个大佬写的一篇,补充了安装SDCC的一些细节。
还有一篇。
本文作者: Shixin
本文链接: https://physxz.github.io/posts/10018/
版权声明: 本博客所有文章除特别声明外,均采用 CC BY-SA 4.0 协议 ,转载请注明出处!